


Installing Home Security Cameras Yourself Can Be Easy & Efficient
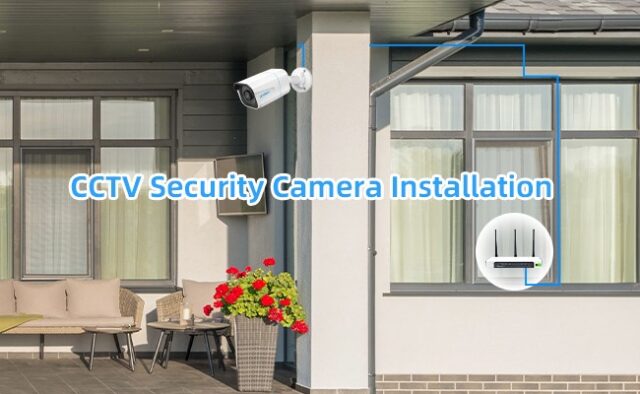
Setting up a CCTV security camera might seem overwhelming, but it can be straightforward with the correct guidance. This article will present a comprehensive, step-by-step guide on installing wired and wireless security cameras in your home. Whether your goal is to monitor your property or enhance your security measures, continue reading for the most effective approach.
Get Special Offers Now for Locksmith Services Call Us Now at 02081458426
Where To Install A CCTV Camera?
The location of a surveillance device holds great consequences as its spot directly influences its monitoring capacities. Unwanted visitors typically aim for access factors like entrances, windows, and back entrances, making it crucial to site cameras in these fundamental spots. In addition, increasing the device to a top of around 9 feet above the floor is essential, enabling broader locale protection and discouraging likely destruction.
Which Type of Home CCTV Camera to Install?
The ways to set up security cameras at home are not the same for every option available. It is worth noting that the cameras addressed here use the internet, sending information through wires or wireless signals instead of traditional methods. Since the processes for installation differ between these and standard cameras, it is essential to identify which kind you have before going further with the directions outlined here.
Below is a list of security cameras, categorized by their power source and network connection method.
| Camera Type | Power | Network |
| PoE camera | Ethernet cable | Ethernet cable |
| WiFi camera | Power cable | WiFi connection |
| 4G camera | Battery/Solar Power | 4G/5G LTE |
Two categories: wired & wireless
IP security cameras can be sorted into two primary types: those connected by wires and those using wireless connections.
Wired cameras involve PoE (Power over Ethernet) cameras, efficiently delivering data and obtaining power through a solitary Ethernet cable. This feature permits a streamlined and speedy installation process.
Wireless cameras consist of WiFi transmitting data wirelessly to a router; however, they require power lines for operation. Unlike PoE cameras, wireless WiFi cameras offer a more adaptable and uncomplicated installation experience. The choice between wired and wireless security cameras solely hinges on your security requirements.
Battery-powered security camera
Choosing cameras that operate using stored power is an excellent option to prevent knotted wires and drilling demands, especially when setting up cameras in outdoor areas next to building entrances or windows. This selection is particularly advantageous when working with brick surfaces. The massive benefit of being completely cordless guarantees the lack of lines and wiring requirements from the starting point to the conclusion. This allows you to place the camera on a shelf, table, or wall without running any cables.
How to Install CCTV Camera at Home: Step-by-Step Guide
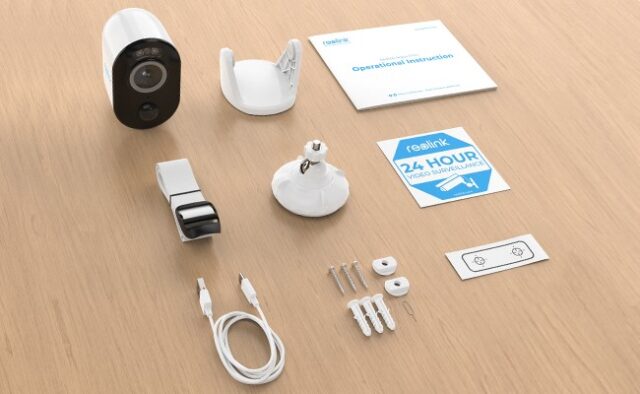
Setting up a self-installed camera surveillance system within your residence is more straightforward than one might imagine. Following the outlined steps with the proper equipment and supplies prepared beforehand will permit even novices to install the cameras relatively simply. Generally, the household tools required for security camera installation include screws, a device to drive screws, an electric drill, a stepladder, a hammer, and wires to route cables behind walls. For those obtaining an all-inclusive security camera unit, installation materials like attachment devices are usually contained within the camera packaging.
Now that you’ve prepared everything, it’s time to do it yourself!
Step 1. Check for Spots
This marks the initial significant step in the DIY installation process for home surveillance systems. Take careful consideration of the subsequent details when determining the camera placement areas:
- Elevate your camera positioning to ensure a more precise and broader field of view. Optimize the coverage of entry points while minimizing camera count to economize on costs.
- Position security cameras away from potential intruders, thieves, or naughty children.
- Prevent direct camera alignment with light sources to avoid slight underexposure of captured videos and images.
- Select locations near a power source, as even wireless CCTV cameras may require a power supply.
- Install the necessary mounting bracket beneath the eaves to shield outdoor security cameras from inclement or severe weather conditions.
- Refrain from situating security cameras behind windows, which could lead to overexposed images and videos due to infrared reflection.
- Avoid installing security cameras on neighbors’ properties or areas where people reasonably anticipate privacy.
Step 2. Mount Cameras on the Wall
Specific security cameras, like the Reolink PoE dome/bullet IP cameras, are comprehensive packages featuring inclusive mounting brackets and screws. These packages typically include a mounting hole template to simplify your initial video security installation.
Here’s a guide on how to employ the mounting template enclosed within the camera package:
Commence by selecting your desired camera placement location, then affix the mounting template onto that chosen spot, such as a wall.
Then use a drill bit the same size as the screws that came with your camera to drill pilot holes in each marked location on the template.
For a structure with wooden slats, you can directly make openings. Yet, if dealing with a plasterboard, use an electric drill with a timber-cutting part first to start an initial gap. Then, change to a steel cutting part to finish the concluding gap.
Next, the camera was situated in the location that had been settled upon, and perforation indicators were laid out. The holes were then drilled, and the camera was firmly fastened to the places on the wall, ceiling, or any other spots that had earlier been resolved for installation. Finally, it guaranteed the camera was angled and situated in the way required to accomplish ideal surveillance over the zone.
Step 3. Arrange Wires and Cables
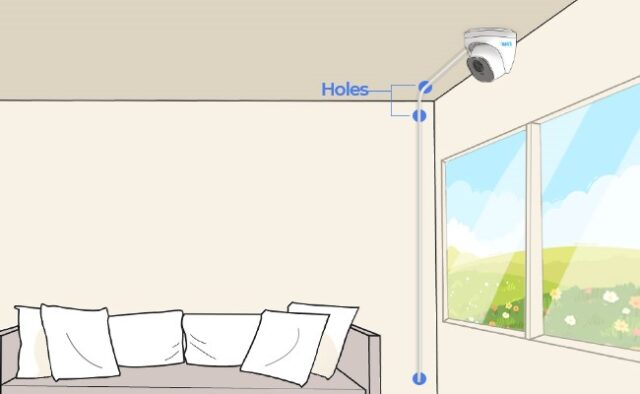
Setting up a home security camera system that regularly poses the most difficulty is organizing the wiring and cords.
Before starting the process, it’s imperative to thoughtfully devise the route for your security camera lines, particularly when handling several camera placements across diverse areas like corridors, lower levels, garages, attics, beneath overhangs, or ceiling edges.
Holes were cautiously bored at the assigned spots where cords were meant to go through. When putting up cameras in a multi-level dwelling, ponder the most immediate way for the cords. Pass all the finishes of the camera strings through the bored openings, applying fish tapes to facilitate clean twine travel.
You can pick wire defensive cases or channels to guarantee the grouping of cords and defend them from wear and harm. It’s additionally conceivable to assign a particular room where you need all your links to meet, streamlining their course.
Step 4. Connect Wires and Power On
Following the completion of the wiring procedure, the subsequent step involves linking your home CCTV security camera and verifying its access to a power supply. In this segment, we will provide comprehensive wire diagrams detailing the process of camera connection, encompassing both wired and wireless camera setups.
Diagram for Connecting PoE Security Camera:
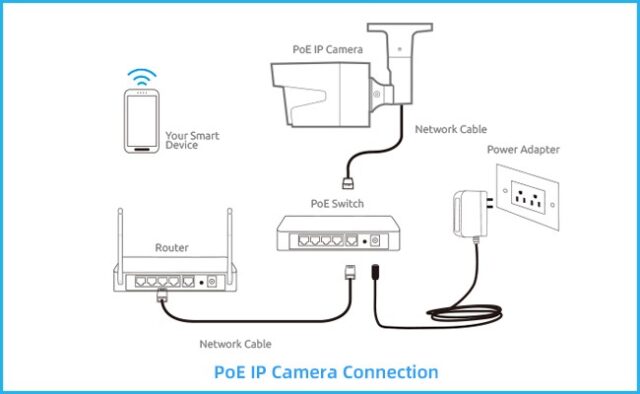
The illustrated diagram depicts the arrangement of components, including a camera, a router, a PoE switch, and a power adapter. The camera is linked to the router via a signal cable. The router, in turn, connects to the PoE switch using a LAN cable. The PoE switch connects with the power adapter via a power cord.
Wireless IP camera connection diagram:

The schematic displays an unfastened protection camera effortlessly connected to a switch through a wireless bond. The camera constructs an untethered association with the switch, eliminating the need for links. A power converter is applied to furnish vitality to the camera.
One must contemplate the circuits and energy demands for a surveillance system and a screen if employing such machines. Both the design and screen necessitate suitable circuitry and power sources, and it may streamline wiring and cable arrangement to connect them to an identical dedicated outlet.
Additionally, continuous monitoring is critical, as interruptions could enable unlawful access. Acquiring equipment to provide temporary electricity, like a portable battery, for surveillance is prudent. Otherwise, utilizing a motor and connecting the security framework can allow uninterrupted video amid power issues.
Step 5. Set Up the Security Camera (System)
Examining every camera’s viewpoint is beneficial before believing the installation work to be finished. Confirm the cameras’ performance, ensuring they are working and continuously chronicling. Also, assess the range of view to validate its helpfulness.
Numerous companies that create do-it-yourself house surveillance cameras provide devoted cellular and computer programs. These instruments permit faraway right of entry to your cameras and the use of cell phones, PCs, and tablets. To match your wants, modify the tracking functions within the software or consumer, comparable to natural looking, motion perception, and video recording.
Here is a straightforward three-phase procedure to set up for viewing for digital cameras in under a couple of minutes: First, attach the camera to your router using an Ethernet cable or over WiFi if it supports it. Then, download the camera app and create an account to sign in. After that, install the camera by inputting its serial number or scanning the QR code. Within moments, you’ll be watching from afar.
Install the designated program or software onto your mobile devices or computers.
Start the program and enter an uncommon signifier (UID) to include the camera gadget.
Choose the video device inside the software or client to view ongoing transmissions across the internet away from your local network.
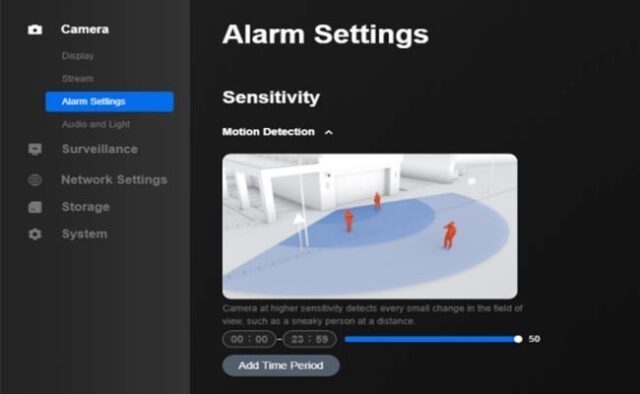
To prepare motion detection in the Reolink application, follow these methods. It’s vital to pay attention that the configuration screen can differ for cameras from various creators.
CCTV security camera installation costs
Both doing the security camera work on your own and employing experts have benefits and drawbacks to weigh. Handling the camera setup solo can trim expenses, yet using specialists takes it if activities like puncturing openings and routing lines cause issues. Paying others for the work might be a sensible choice.
Before ultimately settling on your choice, looking into the expenses connected with expert assembly is a good idea.
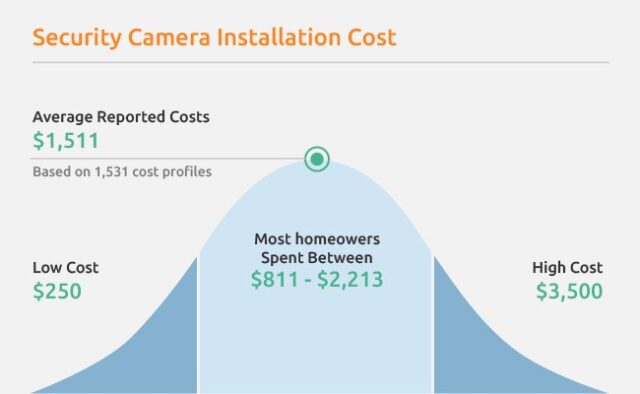
Typically, employing an expert to install a full security setup for a residence can involve up to $3,500. Furthermore, there may be supplementary bills for initiating the observation units.
Choosing the do-it-yourself route for putting protective lenses around the house means dodging all costs linked to the establishment. Taking after the thorough bearing supplied overhead confirms an unblemished surveillance framework preparation.
To avoid unnecessary costs, someone may want to look into doing their home security setup and independently carrying out the design.
Tips and hacks for CCTV camera installation
A PoE camera is a great option
When installing a wired security camera system for your home, choosing a camera with PoE capability provides an intelligent option. PoE refers to Power over Connection, signifying a technology that permits visuals and power to travel through a lone network line. This streamlined method dramatically simplifies the installation process for a wired PoE internet protocol camera, as you solely need to route a single cable to the camera.
Use a power extension cable
Installing a home security camera means finding the proper energy source if a power outlet is nowhere near. Devices using DC power require a socket for operation. An extended cord is a functional remedy when no outlet is nearby. Connecting the camera to electricity distant from its location resolves the issue nicely. Securing property demands getting innovative with solutions sometimes. An extended cable permits placement anywhere needed.
Running a line from the energy supply circumvents reestablishing an outlet near the camera. This method is frequently utilized by those skilled in CCTV installation – all required is an extending power cable for direct current. Affix one finish of the extending line to where the supply lines are and guide the other finish to where the camera will be situated. This process makes the installation significantly smoother.
How to Avoid Blind Spots?
When installing home CCTV systems, carefully considering the camera’s angle is crucial. Ensure your camera’s field of view encompasses critical areas to eliminate potential blind spots.
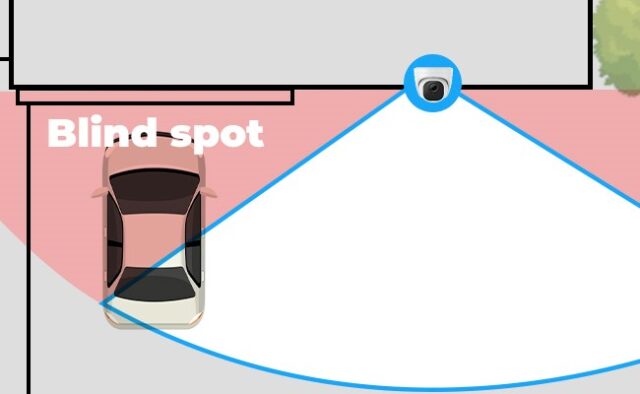
Here is a helpful hint to figure out if there are spots cameras cannot see: take pictures of the places you want to watch from exactly where you will put security cameras. By looking at these photos, you’ll understand the lens type needed for full view and find the perfect position to install them.
While managing a large piece of land, two tactics can help with unseen areas. Buying a surveillance camera setup with many lenses can be worthwhile if funds allow. Spreading these lenses across diverse places ensures every spot of the property is seen.
You may ponder the likelihood of opting for a broad-perspective camera to eradicate areas unseen. Select a 180-degree panoramic double-lens surveillance unit, a 360-degree fisheye security monitor, or a movable and zoomable observation camera. Even with solely one surveillance unit in place, you can take pleasure in an extensive view.
How to Hide Security Cameras?
In setting up a surveillance camera, it’s fundamental to understand that a security recording device alone does not assure absolute safety. Even though some folks place their monitoring cameras where anyone can see to discourage less dedicated lawbreakers, it’s significant to comprehend that determined trespassers may try to turn off a camera as a preventive step for their planned behaviors.
Keeping your surveillance sensors out of sight becomes critical if the goal is to hinder meddling by likely trespassers. Surveillance sensors tucked away have a greater probability of recording the facial profiles of thieves oblivious to being watched.
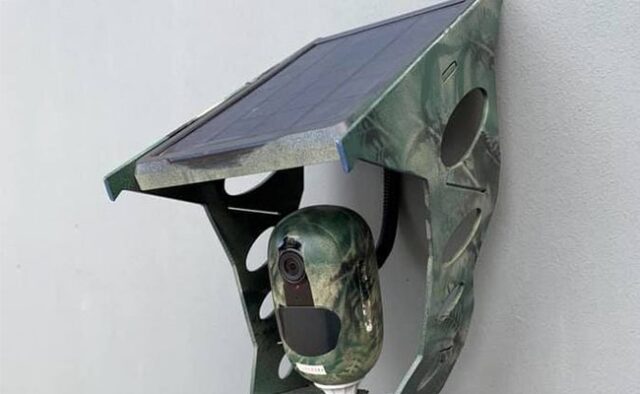
Here are some tactics that could cloak your surveillance devices: Installing spy cameras requires obscuring their presence. Specific approaches may shield cameras from detection: positioning lenses in discreet spots, utilizing camouflage to blend optical sensors into surroundings, and implementing decoys to divert attention from actual surveillance technology. While protecting privileged viewpoints, maintain caution that no person feels threatened by unacknowledged observation.
The surveillance device should be disguised to match its backdrop flawlessly. An artfully concealed monitor can go practically unseen without enhancement. Blend the monitor evenly into the environment by applying uniform coloration. A monitor camouflaged exquisitely may experience difficulty being detected with natural vision alone. The camouflaged monitor retains the ability to observe unseen.
Place the surveillance device within a feathered home’s walls, allowing a gap for the optical piece. This keeps the machine fully covered inside the feathered dwelling, avoiding being seen.
– Disguise the observation devices with things around them. Use tree limbs or plant leaves to conceal the observer’s body for outside arrangement. For inside placement, incorporate the observer into everyday items like bookshelves, fire alarms, desk flora, tissue containers, and more.
Though secretly placing viewfinders can bring pleasure and help, it’s vital to guarantee the eye of the gadget stays cleared consistently.
How to Protect Outdoor Surveillance Cameras?
Surveillance devices outdoors demand particular precautions owing to their susceptibility to severe climate and plausible destruction. It’s essential to consider these issues upon putting in a monitoring camera.
Those who call places prone to rough conditions home must know that any surveillance system can withstand nature’s trials. A watch with a score meaning dust nor rain can bother it, like “66”, will keep its eyes open even when storms lash. For example, a guard outdoors with such a mark can keep its post clear and dry despite particles or pouring water, genuinely making it waterproof.
In addition, think about getting a rain cover or enclosure to protect outside home surveillance cameras from precipitation, snowfall, dirt, warmth, and other outer aspects.
It’s prudent to situate the device higher up to prevent harm to the lens, farther than what fingertips might touch. Hiding the device, as stated before, is also a successful tactic.
Beyond protecting the lens, it is crucial to avoid neglecting the discernibility of cords, links, and joiners. These aspects can be masked by guiding wires within dividers, ceilings, and skirtings or by employing nexus boxes to keep them from perception.
Conclusion
While establishing a camera watch for the house, recall that numerous selections are possible, and the travel can be enjoyable and smooth. Begin by choosing a lens intended for those without guidance, then deeply research safety system evaluations to comprehend what fits your needs. After determining your decision, don’t neglect to impart your setup adventure with others – we’re eager to learn ultimately about it!
Frequently asked questions
What are the benefits of installing a DIY home surveillance system?
DIY home surveillance systems offer cost savings and flexibility in installation. They empower you to customize camera placements and settings according to your preferences, providing an added layer of security.
How can I prevent my security cameras from being tampered with by intruders?
Consider hiding your cameras creatively or using camouflage techniques to deter tampering. Placing cameras out of arm’s reach and selecting inconspicuous locations can help safeguard them. Investing in weatherproof enclosures and rain covers protects cameras from harsh elements.
Should I opt for wired or wireless security cameras?
The choice depends on your preferences and the installation scenario. Wired PoE cameras offer a streamlined installation process and consistent power supply. Wireless cameras provide flexibility in positioning but may require closer proximity to power outlets or regular battery replacement.
How can I ensure adequate coverage when installing multiple cameras?
To prevent blind spots, take photographs of target areas from potential camera locations to gauge angles and coverage. Camouflaging cameras or positioning them within objects like birdhouses or foliage can help blend them into their surroundings. Consider using wide-angle cameras or investing in a multi-camera system for comprehensive coverage.